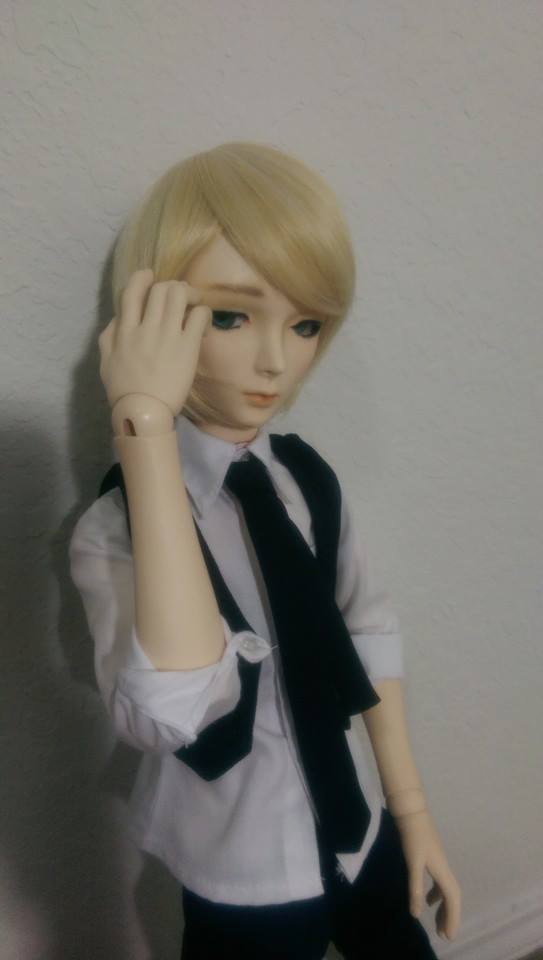
Does your beautiful BJD fall or doesn’t maintain the pose you want it to?
I know, it might feel frustrating. However, there are some easy fixes to that issue – sueding or wiring. Suede adds friction between the ball and socket giving your doll more stability and ultimately improving its poseability. Wiring can help keep pieces stable and in place.
Keep reading this article to discover the exact steps to get your BJD to maintain the pose.
But before we move to the step-by-step guide, let’s see which dolls are built for posing.
| Key Takeaway | Summary |
|---|---|
| Sueding and wiring are effective fixes for poseability issues in BJDs. | Sueding adds friction between joints, while wiring provides stability. |
| Not all BJDs are built for posing; factors like engineering and center of gravity affect poseability. | Understanding the construction and balance of your doll can help with posing. |
| Sueding involves using moleskin or suede to improve stability and reduce wear and tear. | Cutting, shaping, and adhering suede pieces inside joints can enhance poseability. |
| Hot glue sueding is a simpler method using low-temperature hot glue and paper. | Applying glue to the joints and adjusting the fit can improve poseability. |
| Wiring involves running coated wire through the doll’s internal parts for added stability. | Selecting the right wire size and carefully threading it through the doll can enhance posing abilities. |
| Additional posing tips include using props for support, being patient with pose experimentation, and seeking inspiration from magazines or online. | Exploring different poses and expressions can bring your BJD to life. |
Related/ Helpful Articles:
https://bjdlife.com/bjdsandsealants/
https://bjdlife.com/5-things-you-can-do-to-improve-your-bjd-photos/
Dolls Built For Posing
Ball-jointed dolls hold poses because of their joints and the tension of the elastic string inside of them. And as the BJDs differ, some dolls pose better than others due to various factors:
Engineering: Every doll is built in a different way. BJDs that have solid, one-piece torsos aren’t able to bend their backs. Some dolls don’t have mobility joints or slits, so they may have issues with sitting. There are also double-jointed dolls that tend to pose better because they can do more with their joints. On the other hand, single-jointed dolls are said to be excellent at standing. However, note that more joints don’t mean better posing. Construction of the joints can make or break a dolls ability to pose.
Center of gravity: Not all dolls have the same center of gravity. And this point is extremely important because posing dolls means balancing them. For example, moving the arm may make a big difference. Remember, the center of gravity changes from pose to pose.
Friction (sueding): Sometimes joints keep slipping and because of that, you can’t pose your doll the way you want it to. Adding friction inside the joints can make a big difference. You simply have to glue a piece of suede/mole skin into the socket so the joints don’t slip anymore. You can also hot glue suede which is a very popular way to sued dolls in the BJD hobby. You can get a low temp glue gun and essentially smear it in the inside of the joints. (You will learn more about sueding a bit later in this article).
Wiring: Sometimes sueding and restringing a doll isn’t enough. You can run wire ( I like to use telephone wire that is coated with plastic) through the dolls inner parts. You can use it for the legs, arms, or both. This really ensures that your doll parts will stay in place with you pose them.
How to Suede Your Dolls With Moleskin or Suede
So how do you improve the poseability of your BJD, you might be asking.

Actually, sueding dolls is an amazing technique to improve your BJD’s stability and poseability. Basically, you take a tiny piece of suede to coat the inner parts of your doll’s joints – knees, hips, ankles, shoulders, elbows, and neck.
The sueding technique helps BJDs not only to pose better but to reduce wear and tear as well.
Things you’ll need for sueding your BJD:
- Scissors – obviously, you’ll need sharp scissors to cut the suede into tiny pieces.
- Suede – real suede holds up longer and you can find it in small pieces at craft stores. Also, a thinner suede would work better than a thick one.
- Elmers Glue – (quick-dry or regular) is probably the best option to glue the suede without damaging your doll. Some people also use hot glue as well. (If the moleskin does not have adhesive already)
Now let’s go through the step-by-step guide to sueding your BJDs:
Step 1: Cut the Suede
Obviously, the first thing you have to do is cut the suede to get a half-circle shape. The suede size should be about the same as the joint you want to suede.
Step 2: Reshape the Suede Pieces
Once you have a half-circle shape cut out, you should cut pie slices from the center of the circle nearly to the edge of the circle. This way, the moleskin will lie flat in the socket.
Make sure you don’t cut all the way to the edge.
Step 3: Replace the Adhesive Backing
Then remove the adhesive backing and adhere it inside the socket. But be careful not to block the canal through which the elastic string runs.
Also, try to keep the moleskin below the outside edge so it’s not visible on the outside. If it doesn’t work the first time, don’t worry, because you can always peel it off and stick again to make it perfect.
Step 4: Repeat with Another Half
After you’ve placed one half of the circle, it’s time to repeat the same with another half of the joint.
Step 5: Fit the Ball Back into the Socket
When you’re done fixing suede on both sides of the joint, simply allow the ball to fit back into the socket.
The ball will automatically push the moleskin into place and you’ll feel the difference in your BJD’s poseability immediately.
Step 6: Adjust the Moleskine Size
You’ve already finished sueding your BJD. However, after putting everything in place, you may see that the moleskin is showing out. If this is the case, you can easily peel it off and cut smaller (or larger) pieces to create a better fit. Since it’s easy to remove and doesn’t leave a residue, you don’t have to worry about spoiling your BJD.
How to Hot Glue Suede your BJD
Now my personal favorite that I do with my doll is hot glue sueding. It is very simple and doesn’t involve sizing materials or anything complex.
Things you will need to hot glue suede your doll:
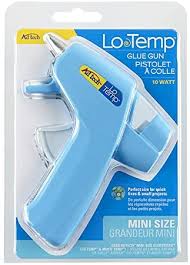
- Low temp hot glue gun
- glue gun sticks
- piece of paper
- Xacto knife
- Tweezers
Step 1: Turn on your glue gun
Your glue gun needs to be on and fully heated before you work with it. Make sure your glue gun is set to low temp settings so that way you do not damage your doll. Using low temp also makes it easier to peel out if you need to redo it.
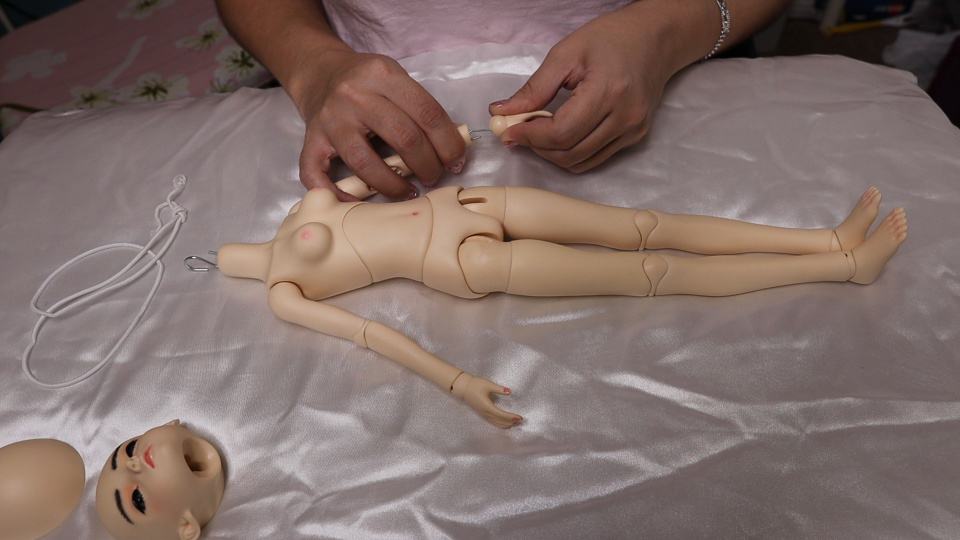
Step 2: Take your doll apart
In order to hot glue suede I recommend you taking your doll apart so that way you have full access to the socket areas.
Step 3: Tear your paper
Some people have magic fingers and can smear the glue with their fingers. I cannot! I use regular paper that I will tear in finger sized pieces that are doubled, to help use kind of like a knife to spread the glue. Have all your materials placed in front of you, ready to go. Once you start you will have to work at a quick pace.
Step 4: Putting glue in the socket
Personally I like to place a glob of glue onto my paper and then smear it around the joint. You want to make sure you do this with care so that way it is evenly spread on the inside and that you can cover the whole area. Some people also like to put the glue directly first onto the doll and then smear but I like to do it the other way around. If you happen to make a mistake, let it cool and then peel it out. If you try to peel it off immediately you are in for a sticky battle. Tweezers can help get tricky bits out too.
Step 5: Inspect your glue
If you notice there is excess glue flooding over the edge you can either try to carefully peel that portion off or VERY carefully with an Xacto knife cut it off. Just be super careful when using an Xacto knife around the resin because it can damage and scratch it. Give the glue ample time (at least 10 min) to fully cure before you put your doll back together.
Step 6: Repeat process on other parts
You will do the same thing on any parts you want to suede. I usually like to do the neck, shoulders, wrists, thigh joints, and torso.
How to wire your BJD
The final technique is a bit more trial and error. You will need to go to your local hardware store and look for a wire that can fit through your doll. I went to Lowes and there I found wire that was meant for telephones and it was encased in a soft plastic. This was nice because all I had to do was seal the ends with hot glue and it helped ensure my dolly as safe when I was running the wire through it.

You are also going to want to test out the strength of the wires. You don’t want something too weak that won’t make a difference nor do you want a wire that is too strong that will require too much effort to move. Something else to keep in mind is that different parts of the body have different opening sizes. So your wire needs to fit through your pieces along side the elastic that is taking up space there too.
Things you need for wiring a BJD
- Wire (depends on how big or small the doll is and what can fit in the internal parts)
- Wire cutter
- hot glue gun
Step 1: Prepare the wire
If you happen to get a wire that has exposed ends you will want to put a small dab of hot glue on them to help prevent scratching. Measure the area you are looking to wire. If it is the arms you are going to want to measure from wrist across chest to other wrist. Cut and size accordingly.
Step 2: Place wire inside the body
If you are doing the arms it will take just one wire that can be fed through one arm, go through the chest and out the other arm. You are basically mimicking the way the elastic is threaded through. Let’s say you want to wire the legs, the easiest thing to do would be to make a U shape and feed it through the hip area. If you are able to access that area without taking it apart then great! If you have a single piece torso you will need to find a way to access the hip area to feed the wire through.
Step 3: Make adjustments
Once the wire is in you might need to shift it around so you can have it resting nicely inside the body. If you want it to stop right before the writs then you might need to cut it and reseal the ends. Make sure that your wire is evenly placed in the body too before you start bending it.
TA-DAH you have now found some ways to help improve your BJD poses!
BJD Posing Tips
Now that you know how to improve the poseability of your BJD, I’d also like to share some tips that might be helpful for you to pose your BJDs better.
- Let your doll lean on something because otherwise, it might fall.
- Keep patient because you might need to try to pose your BJD multiple times until you get that unique pose you have in mind.
- Play with your doll to learn how their joints move, where’s their center of balance, etc. Most importantly, try different poses, not just standing and sitting, give them expressions.
- If you run out of posing ideas, I’d recommend you get a magazine or look online and imitate the poses of the models.
In conclusion, mastering the art of posing BJD dolls is an essential skill for collectors and enthusiasts alike. By understanding the factors that contribute to a doll’s poseability and debunking common myths surrounding yellowing, you can confidently enhance the stability and flexibility of your resin companions.
By incorporating sueding, wiring, and posing techniques into your doll maintenance routine, you can create captivating displays, capture stunning photographs, and truly showcase the artistry of your BJD collection.
So, let your creativity soar, explore the possibilities, and enjoy the endless joys of posing your BJD dolls to bring your imaginative visions to life. Unleash the magic and artistry within your resin companions, and let them captivate your heart and inspire your artistic endeavors.
Recent Posts
Come join my BJD Newsletter where you will learn about new dolls coming out, BJD doll sales, and artist highlights! There will also be other BJD goodies just for you!
When to Restring: Recognizing Signs Your BJD Needs a Tune-Up
Learn how to recognize signs your BJD needs a tune-up and restringing process. Maintain your doll's stringing for longer life with this step-by-step guide.