Introduction

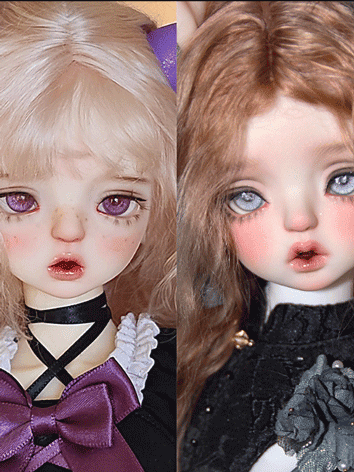
(Image courtesy of Legenddoll)
Ball-jointed dolls (BJDs) are highly customizable dolls that have gained popularity in recent years. Collectors love them for their unique appearance and the ability to personalize them with face-ups, wigs, and clothing. A face-up is essentially the makeup applied to a BJD’s resin head to create a unique look (not actual human makeup but we will get to that later).
Unlike traditional dolls that already come with pre-painted faces, some BJDs require customization from their owners. A face-up can really change a BJD’s appearance.
It determines the personality and mood of the doll, bringing it to life. Mastering the art of BJD face-ups is not only crucial for collectors but also for artists who wish to create custom dolls professionally.
In this article, we will cover everything you need to know about BJD face-ups as a beginner. We will discuss the definition of BJDs and face-ups, why improving this skill is important, and provide an overview of what you can expect from this article – including tips, techniques, common mistakes to avoid when applying a face-up on your doll.
Understanding the Basics of BJD Face-Ups
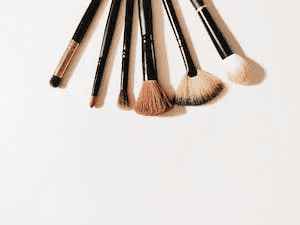
Materials Needed for Face-Up

Before starting on a BJD face-up, it is important to ensure you have all the necessary materials. The most important materials required for a BJD face-up are acrylic paints, watercolor pencils, chalk pastels, and MSC (Mr. Super Clear) UV cut spray.
Other materials that may come in handy are fine brushes, magic clean erasers, Q-tips, cotton balls, and toothpicks. It is important to invest in a variety of materials to achieve the desired effects.
Understanding the Doll’s Anatomy and Facial Features
A basic understanding of facial anatomy will go a long way towards achieving a professional-looking BJD face-up. You should study your doll’s facial features to see how they naturally align with one another – for example, where the eyebrows sit in relation to the eyes or how the nose shape complements the lips. This helps you choose an appropriate design and avoid mistakes while painting.
Prepping the Doll for a Face-Up
Before you start applying paint, it is essential to properly prepare your doll’s surface. Start by giving your doll a good wash with soap and water; this removes any dust or grime that may interfere with painting. Using masking tape or liquid latex around areas like eyes or lips will help prevent accidental smudging during painting These areas are also prone to staining from paint so it’s best to cover them up before starting your masterpiece!
Step-by-Step Guide to Mastering BJD Face-Ups
Sketching and Planning the Design

Before diving into the actual face-up, it’s essential to have a plan in mind. Take some time to study the doll’s features and sketch out your design. This step helps avoid mistakes, and you can have a clear idea of what you want to achieve.
You can use the sketch as a reference throughout the process. When selecting your design, keep in mind that less is more.
Sometimes less is more and a minimalistic face-up will always look better than an overly complicated one. This is especially true for those who are new and just starting out on face-ups. Consider what suits your doll’s personality.
Applying Base Colors
Once you have your design planned out, it’s time to apply base colors. Start by cleaning the head with rubbing alcohol and then cleaning it with soap that is unscented and uncolored. Allow the head to dry and then get ready to seal it. By applying an appropriate sealer you will get a better adhesion of subsequent layers of paint and pastel. You can use watercolor pencils or acrylic paints diluted with water for this next step.
Apply thin layers so that you don’t end up with uneven coverage or clumps of paint on your doll’s face. Be patient throughout this process, as it requires both time and precision.
Adding Details Such as Eyebrows, Eyelashes, and Lips
The next step is adding details such as eyebrows, eyelashes, lips e.t.c.. To get started on eyebrows, choose a pencil that matches the color of the hair you want to create (or mix two colors together). Use short strokes following their natural direction until they’re shaped correctly. For eyelashes add very thin strokes where necessary using black ink or pencil; you may also use other colours if desired like white or pink depending on their style.
Lips are key features for any BJD doll but make sure they are not too prominent since they tend to stand out. You can use pastels or watercolor pencils for lips and avoid using sharp lines.
Finishing Touches with shades
When you’ve finished with the detailed parts of the face, it’s time to add any additional color details like blush, shadows, or highlights to bring everything together. Use a small brush to add a little bit of blush color on the cheeks, forehead, nose e.t.c.. Less is more in this scenario, so don’t go overboard. Adding highlights is an optional step but makes a huge difference to the final look of your doll’s face.
Advanced Techniques for BJD Face-Ups
Creating Texture with Pastels and Pencils
One way to add texture to your BJD face-up is by using pastels and watercolor pencils. This technique can give your doll a more natural and realistic look, as it adds depth and dimension to the facial features. To create texture, begin by selecting a soft pastel or pencil that matches the color of the area you want to add texture to.
Then, apply the pastel or pencil in light layers, building up gradually until you achieve the desired effect. When adding texture with pastels or pencils, focus on areas that would naturally have more depth or shadow, such as around the eyes and mouth.
You can also use this technique to create the illusion of wrinkles or blemishes on the skin. Just be sure not to overdo it – less is often more when it comes to creating texture with pastels and pencils.
Airbrushing Techniques for a More Realistic Look
Airbrushing is another advanced technique that can take your BJD face-up to the next level. This method involves using an airbrush tool to apply paint in thin layers, creating a smooth gradient from one color to another.
Airbrushing can give your doll’s face-up a more realistic look, as it mimics natural skin tones and shading. To airbrush your doll’s face-up, you will need an airbrush tool and paints specifically designed for use with airbrushes.
Begin by practicing on paper or a practice head before attempting this technique on your actual doll. When ready, start by applying lighter colors first in thin layers before moving on to darker colors for shading.
Airbrushing takes patience and practice but can produce stunning results when done correctly. To avoid overdoing it with this technique, remember that less is often more – aim for a subtle and natural-looking finish.
Adding Special Effects like Tattoos or Scars
If you want to add a more unique touch to your BJD face-up, consider incorporating special effects like tattoos or scars. These can add character and personality to your doll’s appearance and make it stand out from the rest.
When attempting this technique, it’s important to plan out the design beforehand and use references if necessary. To create a tattoo or scar effect, start by sketching the design onto the doll’s face using a watercolor pencil.
Once you are happy with the design, fill in with acrylic paints using a fine brush. For scars, use shades of reds and browns for a realistic look.
Adding special effects like tattoos or scars requires attention to detail and precision. Take your time and don’t rush – remember that small mistakes can be corrected but major ones could ruin the entire project.
Tips for Beginners to Mastering BJD Face-Ups
Choosing the right materials to use
The quality of the materials you use will have a significant impact on the final result of your BJD face-up. It is important to invest in decent materials such as high pigmented acrylic paints, pencils, pastels, and sealants. Cheap materials may appear dull and non-vibrant on your dolls’ faces.
Additionally, low-quality paint can easily chip or rub off from your doll’s face, ruining your work. It is also important to consider the type of paintbrushes you’ll use.
Synthetic brushes are recommended over natural hair brushes since they are cheaper and easier to maintain. Natural hair brushes can be costly and require more maintenance since they are prone to splitting.
Practicing on cheaper dolls before attempting on expensive ones
Before starting on an expensive doll, it’s essential to practice your skills with a cheaper one first. Cheaper dolls like Monster High or Barbie Dolls can be great for practicing because they allow you to experiment with different techniques before moving onto more expensive dolls like BJDs.
By using a cheaper doll, you will gain confidence in your skills without the fear of ruining an expensive doll’s face-up. This way, even if something goes wrong when working on a cheaper doll, it’s less of a loss than if it was done with an expensive one.
Taking breaks to avoid overworking
BJD face-ups require patience and attention to detail; therefore, it’s easy for beginners or even experts to get carried away and overwork their dolls’ faces. Overworking can lead to uneven coloring or smudging during painting because of sweaty fingers. To avoid this problem, take frequent breaks while working on your BJD face-up project.
It helps avoid hand fatigue that might lead to mistakes and also gives you a fresh perspective when you return. Another great tip is to work on different areas of the doll’s face in different sittings, rather than overworking one area at once.
These tips will help beginners improve their BJD face-up skills and create beautiful art pieces on their dolls. With patience, practice, and attention to detail, your dolls will look stunning.
Common Mistakes to Avoid in BJD Face-Ups
Rushing through steps: Slow and Steady Wins the Race

(Image courtesy DolkBJD)
One of the most common mistakes beginners make when attempting BJD face-ups is rushing through each step. It’s important to take your time and not skip any steps. Each layer of paint or pencil adds depth and dimension to the doll’s face.
Rushing can cause mistakes that can be hard to fix, so take a deep breath, relax, and take your time. It’s better to spend more time on a face-up and get it right than rush through it and end up having to start over.
Not Taking Time to Study Facial Features: Knowing Your Doll
BJD dolls have unique facial features that require careful study before attempting a face-up. Beginners often make the mistake of not taking enough time to study their doll’s anatomy, resulting in a poorly executed face-up.
Take some time studying your doll’s facial features – look at reference photos online or in person if possible. This will help you understand how light interacts with different parts of the face.
Not Sealing Your Work: Protecting Your Artistry
After completing your BJD face-up, it is crucial that you seal your work with an appropriate sealant. Failure to do so may cause smudging or fading over time due to handling or exposure to sunlight. Make sure you use a high-quality sealant that won’t damage or yellow the doll’s resin material.
Conclusion
(Image courtesy of Legenddoll)
Mastering BJD Face-Ups takes patience, practice, and attention to detail – but it is achievable for anyone who puts in the effort! Understanding basic techniques such as sketching out designs, prepping materials appropriately before starting work on each layer are crucial steps for beginners who want success with their projects. Additionally, taking the time to study facial features and take breaks can help prevent common mistakes like rushing.
Ultimately, by following these guidelines and avoiding errors such as not sealing your work, you can produce beautiful BJD Face-Ups that will be enjoyed for years to come. So, get ready to put your creativity into action and create amazing BJD face-ups!
If you want to learn more about BJD face ups for beginners check out some of my youtube videos.
Recent Posts
Come join my BJD Newsletter where you will learn about new dolls coming out, BJD doll sales, and artist highlights! There will also be other BJD goodies just for you!
When to Restring: Recognizing Signs Your BJD Needs a Tune-Up
Learn how to recognize signs your BJD needs a tune-up and restringing process. Maintain your doll's stringing for longer life with this step-by-step guide.